This article will explain how to connect the SiteManager form to a Google Sheet. Every time the form will be submitted, a new row will be added to your Google Sheet.
To connect with Google Sheets please install the Google Drive Integration first.
You can find this in the general settings of your project.
* If it's the first time authenticating with Google, you will find only a single button inside the app. By clicking on this button, a new window will be opened where you can log in to Google. We ask for permission to view all your Google Drive files and to view, edit, create and delete your spreadsheets. These permissions are strictly necessary to be able to select a sheet and to write the data to that selected sheet.
After authentication, a confirmation will be shown, so you know you're successfully authenticated. That's all there is to it!

Connecting to Google Sheets
To use the Google Sheets action, it is necessary to authenticate with Google first. We need to know from which account the sheet can be accessed. Luckily, this is a very straightforward setup, so you'll be up and running in no time!
Google Sheets app
When you install the Google Drive integration, the Google Sheets app will be automatically installed in your project. You can find the app in the toolstack section of the project.

Now going on to the form!
Form action
You can add the Google Sheets action by clicking the 'Edit Form Actions' button. Here you can add all the actions, including the Google Sheets action.
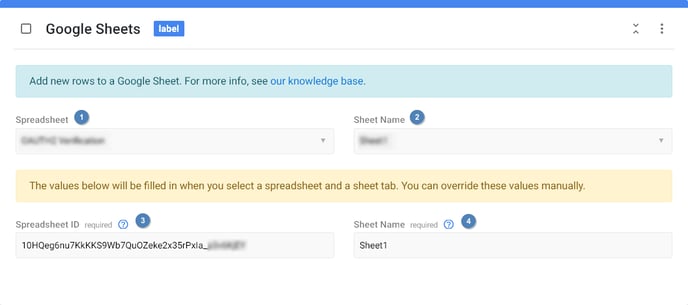
- Spreadsheet: If you're successfully authenticated, you will be able to select a spreadsheet from this dropdown. All the spreadsheets you have access to will be shown here. The selected value will be automatically inserted in the input field at 3.
- Sheet name: After selecting a spreadsheet, you will be able to select a sheet inside the spreadsheet. All your sheets (tabs) will be listed here. The selected sheet will be automatically inserted in the input field at 4.
- Spreadsheet ID: The ID of the spreadsheet. When selecting a sheet at 1, this ID will be automatically filled in. You can override this manually by editing this field.
- Sheet name: The name of the sheet (tab) in the spreadsheet. When selecting a sheet at 2, the name will be automatically filled in. You can override this manually by editing the field, but this name is case-sensitive, so make sure to copy the exact name.
Build form
You can insert multiple form inputs to collect different kinds of data. Be sure to include a submit button (as that is required for every form). No other fields are required, but without any it will be hard to collect data.
Input data
It isn't necessary to add extra data to your input fields. By default, all the fields will be sent to the sheet. You can however still control the fields manually. You can do so by editing the input data on a field and by adding the Google Sheets data. Once you've added one Google Sheets data to a field, only the fields with this data will be sent to the sheet.