Lottie is a little tool that makes it possible to export Adobe After Effects animations and render them natively on the web. This article explains how you can use your own Lottie animations in a SiteManager project.
Animations can be a powerful asset to your project. A good animation can keep the visitor more interested in what your website has to offer. Spice up your website with a few smooth animations instead of static images!
Exporting your animation
The first step is to create your animation. Lottie works with Adobe After Effects, but there are more tools that support Lottie. Follow this guide to export your creation in Adobe After Effects.
Don't have time or the resources to create your own animation? On https://lottiefiles.com/ you can find thousands of free and premium animations that you can use in your project.
Using Lottie files with SiteManager
Using the visual editor, you can install the Lottie snippet in your component. Adding your animation is straightforward; upload the animation to our files library, or use an external URL, for example when using animations from https://lottiefiles.com/.
After saving your component, you will immediately see your animation in its full glory! You can however configure some settings, to be even more in control of how your animation should be displayed. You can find these settings in the functionality panel of the snippet or the component.
Functionality settings
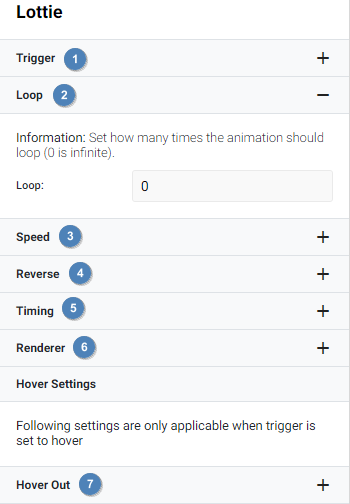 Trigger: Set when the animation should trigger. Possible options are:
- On Load: The animation will play immediately when fully loaded.
- In View: The animation will play once it is visible to the visitor.
- On Scroll: The animation will start playing once the visitor has scrolled on the page.
- On Hover: The animation will play when the visitor hovers over the animation. See (7) for more hover actions.
- Loop: Set how many times the animation should loop.
- Animation Fill Mode: Change the behavior of the animation, after all the loops are completed.
- Forwards: Stay on the last frame of the animation.
- Backwards: Return to the first frame of the animation.
- Animation Fill Mode: Change the behavior of the animation, after all the loops are completed.
- Speed: Control the speed of the animation. 1 is the default speed. Setting the speed to 0.50, will make the animation twice as slow.
- Reverse: Reverse the animation.
- Timing: Set a specific timing for the animation. You can set a start and an end time in percentages. Only the parts between these boundaries will be played.
- Renderer: Choose how the animation should be rendered. Possible options are SVG and Canvas. SVG is recommended in most cases, but when you have a very large complicated animation, canvas could lead to a better performance.
- Hover Out: Choose what should happen when the visitor hovers out of the animation. This setting only works when the trigger method is set to On Hover. Possible options are:
- Continue Playing: The animation will simply continue playing.
- Pause: The animation will pause as soon as the visitor hovers out. The animation will continue playing from where it left off if the visitor hovers back in again.
- Reverse: The animation will reverse from the moment that the visitor hovers out. The animation will continue playing in its original direction when the visitor hovers back in.