---
title: How to setup Google Maps
description: "IMPORTANT: Since 11/06/2018, Google changed its API policy. This means that you no longer can get an API key without the use of a credit card. However, the first $200,00 a month won't be credited and"
---
[Skip to content](https://support.sitemanager.io/en/project/general/how-to-setup-google-maps#main-content)
[](https://support.sitemanager.io/en?hsLang=en)
Open main navigation
Close main navigation
- [Go to sitemanager.io](https://www.sitemanager.io/)
[Go to sitemanager.io](https://www.sitemanager.io/)
How can we help?
- There are no suggestions because the search field is empty.
1. [Knowledge Base](https://support.sitemanager.io/en?hsLang=en)
2. [Project](https://support.sitemanager.io/en/project?hsLang=en)
3. [General](https://support.sitemanager.io/en/project?hsLang=en#general)
# How to setup Google Maps
- [Important](https://support.sitemanager.io/en/project/general/how-to-setup-google-maps#important)
- [First Steps](https://support.sitemanager.io/en/project/general/how-to-setup-google-maps#first-steps)
- [Billing](https://support.sitemanager.io/en/project/general/how-to-setup-google-maps#billing)
- [Enable the JavaScript API Library](https://support.sitemanager.io/en/project/general/how-to-setup-google-maps#enable-the-javascript-api-library)
- [Using the API Key In SiteManager](https://support.sitemanager.io/en/project/general/how-to-setup-google-maps#using-the-api-key-in-sitemanager)
- [How to find your API Key after setup](https://support.sitemanager.io/en/project/general/how-to-setup-google-maps#how-to-find-your-api-key-after-setup)
### Important
**IMPORTANT**: Since 11/06/2018, Google changed its [API policy](https://developers.google.com/maps/billing/important-updates). This means that you no longer can get an API key without the use of a credit card. However, the first $200,00 a month won't be credited and will be free of cost. See [this page](https://cloud.google.com/maps-platform/pricing/sheet/?_ga=2.84205081.1032314698.1539084617-167199994.1537362262) for more details about the updated pricing.
### First Steps
Our first step will be setting up an API key in *[Google Cloud Console](https://console.cloud.google.com/welcome)*. After logging in, you'll be greeted with the next screen
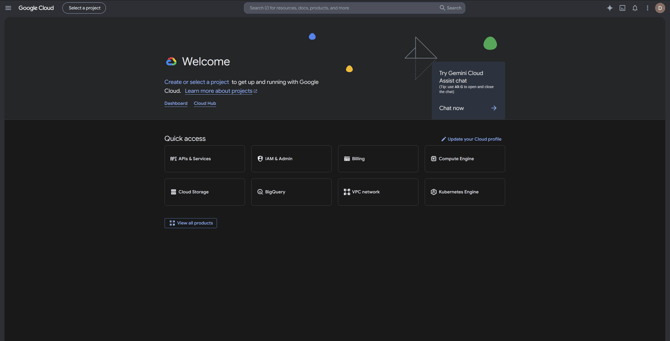
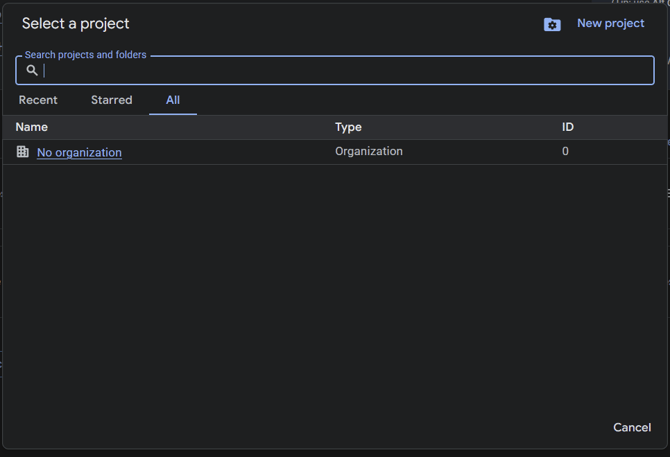
Next up, we will click on the button "Select a project", this will open a popup that'll show all the projects you have made in Google. Since we don't have any right now, we will continue by clicking "New project"
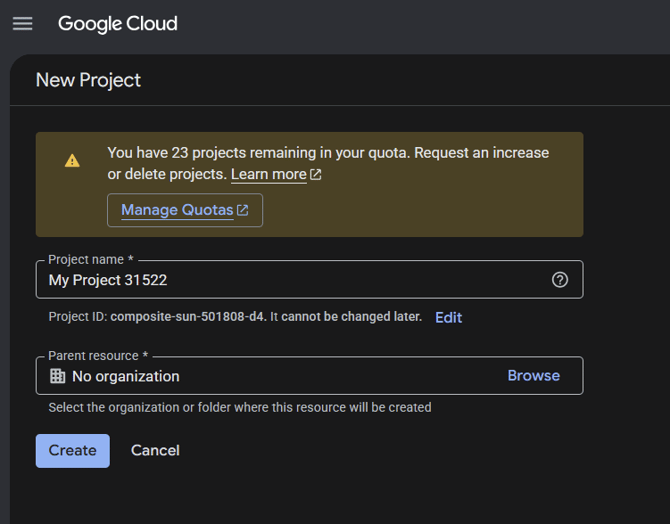
In the next screen, we can give our Project a name.
After creating, wait until you see the green checkmark appear, like in the following screenshot.

In the notification you can click "Select Project" to immediatly switch to your newly made project!
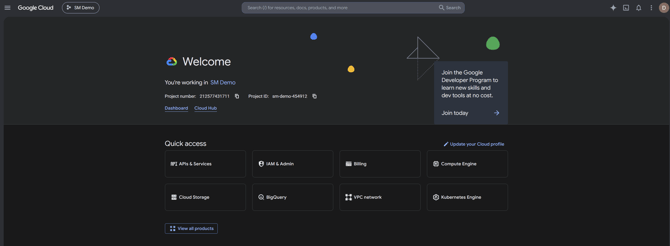
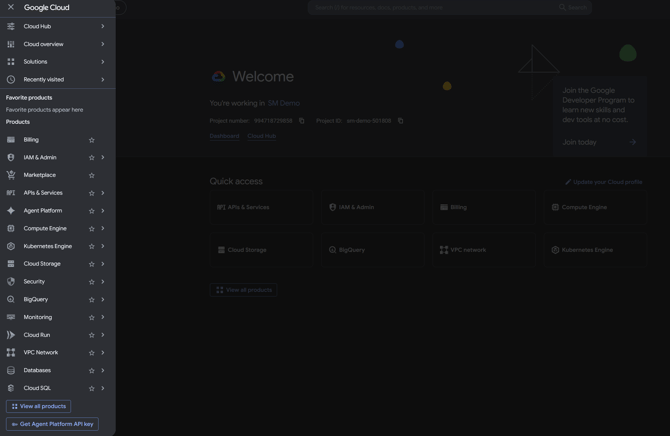
In the left hand corner, click on the icon next to Google Cloud to open the navigation.
### Billing
In the navigation, click Billing. In this screen we can select our Billing when clicking Link a billing account.

Since we have no billing setup yet, the next popup will tell us that we need to enable billing first by navigating to Manage billing accounts
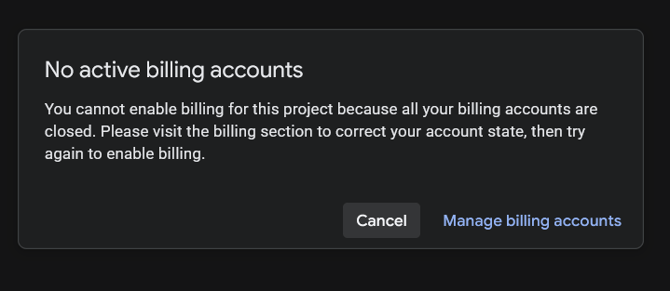
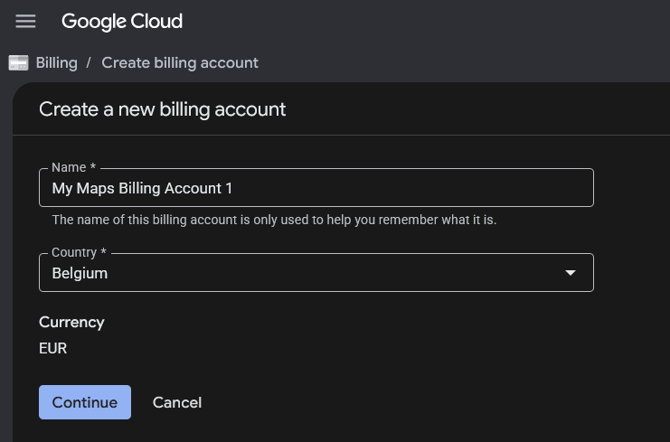
On this page, click **Create account** to setup a new billing account

This will show you the next screen, follow these steps to finish setting up the Billing account.
****
### Enabling the JavaScript API Library
After setting up our Billing, we need to enable the Maps JavaScript API. To do this, open the navigation \> API & Services \> Library
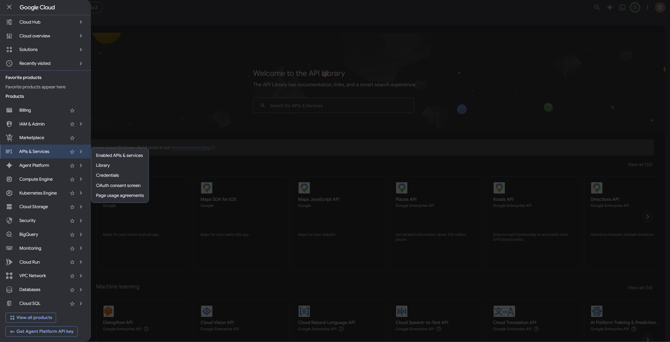
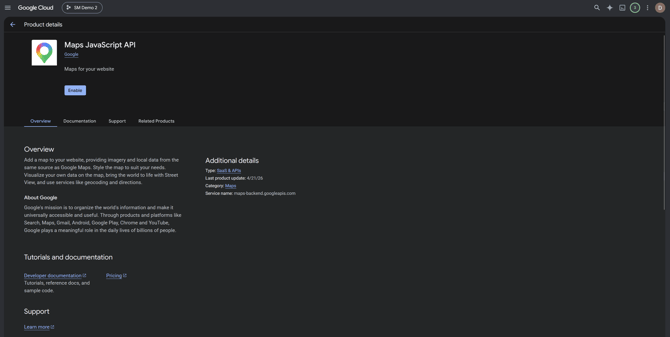
This will show you all the API libraries, look for Maps JavaScript API. Click enable. You'll then see a popup to accept to the terms of service. In the input field, you fill in: confirm.
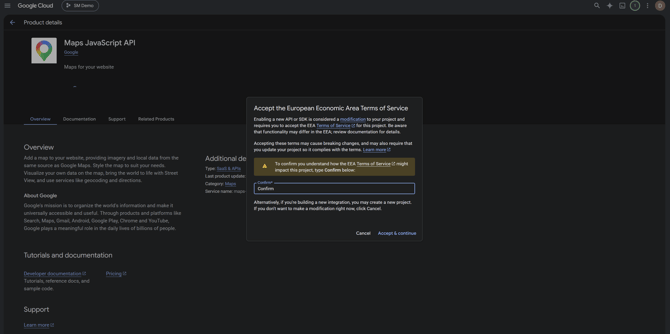
After enabling you'll see a popup that'll contain your API key, copy this to a safe location. Don't worry, you'll be able to find this key after the setup.
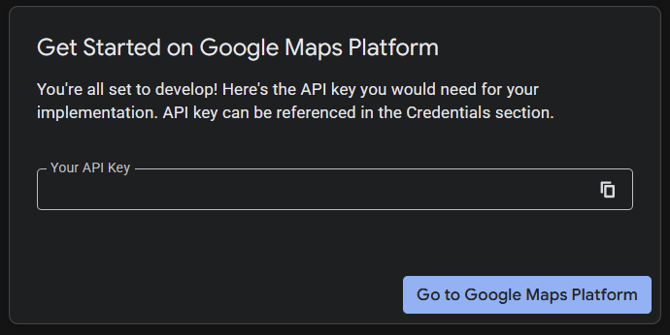
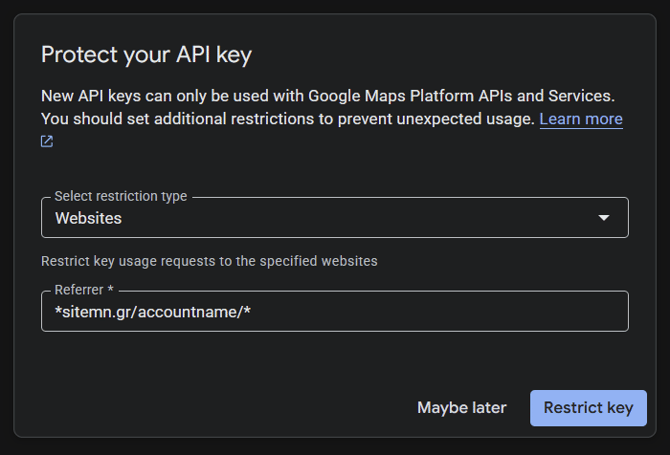
Click on "Go to Google Maps Platform", this will show you the next step, protecting your API Key. In the first dropdown, select **Websites**
In the referrer field you fill in your domainname, click on Restrict Key.
It's important to add **asterisks (\*)** in front and at the end of your domain. This will make sure that all your pages and subdomains will be included too.
### Adding necessary website restrictions
Afterwards, open the navigation in the top left corner \> APIs & Services \> Credentials
**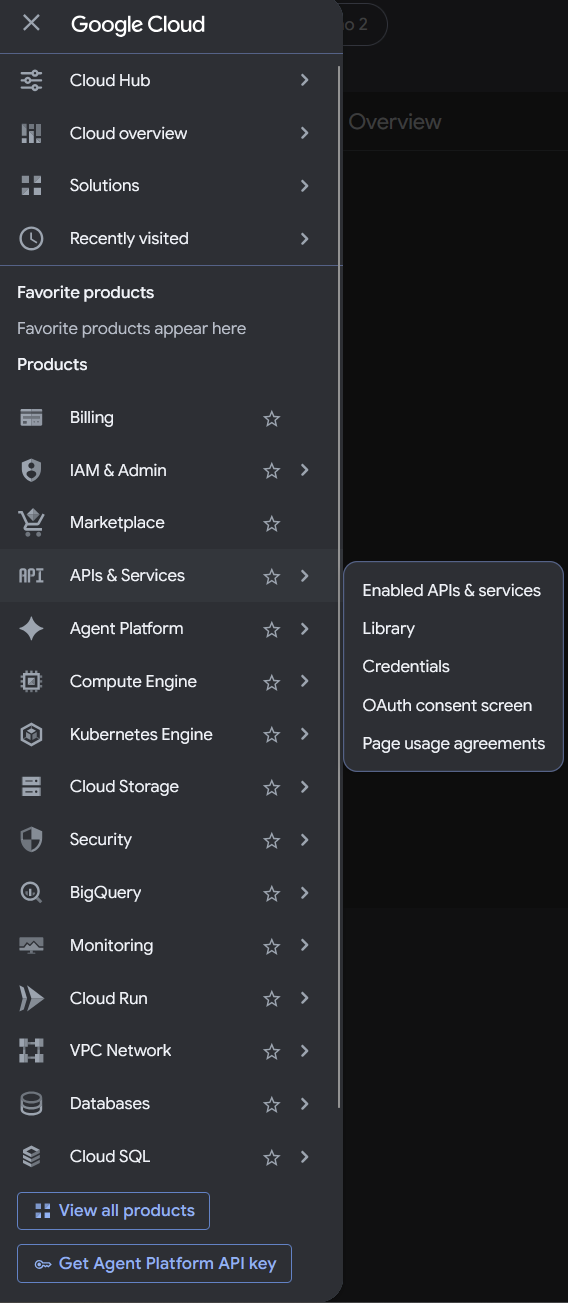**
In this overview you can click on your newly made API key
**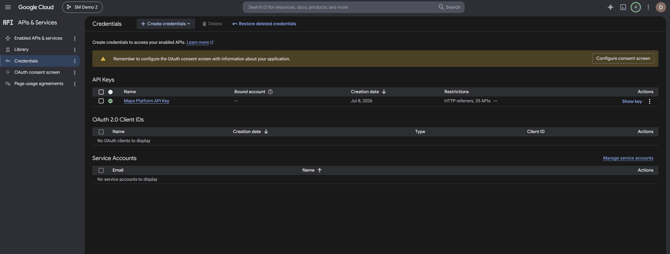**
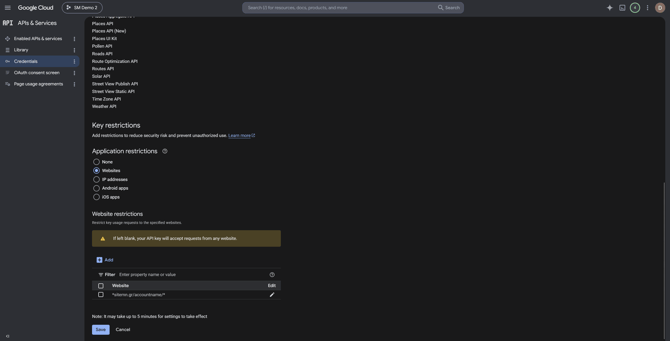
At the bottom of the page we can find our Website Restrictions.
We already added our domain to it, make sure to add these as well:
*\*sitemn.gr/accountname/\*
\*sitemn.gr/users/accountname/\*
\*swcloud.net/users/accountname\*
\*yourdomain.be/\**
****
### Using the API Key in SiteManager
The last step is to add the API key in Sitemanager. We first need the Google Maps API Key Integration. Click **Project \> Upgrade Project**
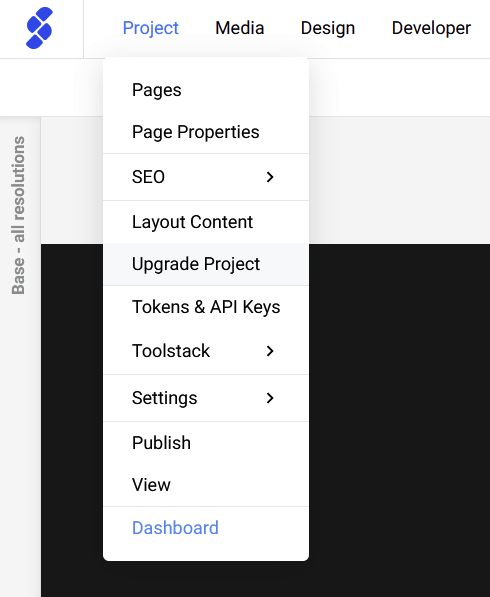
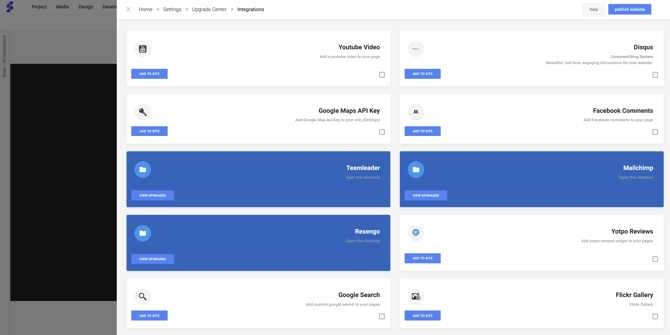
In this overview, navigate to **Integrations**
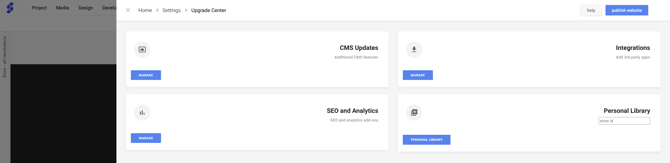
In this overview, click **Add to site** to install the Google Maps API Key
After installing the Integration, click **Project \> Tokens & API Keys**
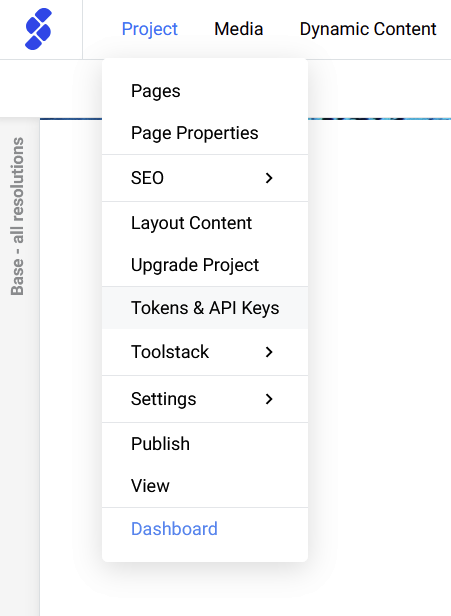
In the list, you'll find **Google Maps**, fill in your API Key

### How to find your API Key after setup
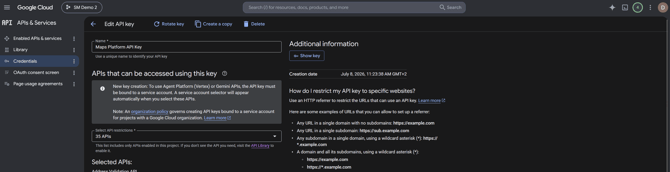
If you forgot to copy your API Key, you can find it in Google Cloud Console, in the overview we added the website restrictions, on the start of the page, you'll see a button **Show Key**, click on this button to view your API Key
- [Getting Started](https://support.sitemanager.io/en/getting-started?hsLang=en)
- [Dashboard](https://support.sitemanager.io/en/dashboard?hsLang=en#main-content)
- [Getting Started](https://support.sitemanager.io/en/dashboard?hsLang=en#getting-started)
- [Project Dashboard](https://support.sitemanager.io/en/dashboard?hsLang=en#project-dashboard)
- [White Label & Add-ons](https://support.sitemanager.io/en/dashboard?hsLang=en#white-label-add-ons)
- [Account](https://support.sitemanager.io/en/account?hsLang=en#main-content)
- [Account Settings](https://support.sitemanager.io/en/account?hsLang=en#account-settings)
- [My Company](https://support.sitemanager.io/en/account?hsLang=en#my-company)
- [Subscription](https://support.sitemanager.io/en/account?hsLang=en#subscription)
- [Project](https://support.sitemanager.io/en/project?hsLang=en#main-content)
- [General](https://support.sitemanager.io/en/project?hsLang=en#general)
- [Upgrade Project](https://support.sitemanager.io/en/project?hsLang=en#upgrade-project)
- [SEO](https://support.sitemanager.io/en/seo?hsLang=en#main-content)
- [Basics](https://support.sitemanager.io/en/seo?hsLang=en#basics)
- [Advanced](https://support.sitemanager.io/en/seo?hsLang=en#advanced)
- [Go Live](https://support.sitemanager.io/en/go-live?hsLang=en#main-content)
- [Prepare Project](https://support.sitemanager.io/en/go-live?hsLang=en#prepare-project)
- [Prepare Domain](https://support.sitemanager.io/en/go-live?hsLang=en#prepare-domain)
- [Going Live](https://support.sitemanager.io/en/go-live?hsLang=en#going-live)
- [Advanced](https://support.sitemanager.io/en/go-live?hsLang=en#advanced)
- [Content](https://support.sitemanager.io/en/content?hsLang=en#main-content)
- [Getting Started](https://support.sitemanager.io/en/content?hsLang=en#getting-started)
- [Page Management](https://support.sitemanager.io/en/content?hsLang=en#page-management)
- [Content Management](https://support.sitemanager.io/en/content?hsLang=en#content-management)
- [Language Management](https://support.sitemanager.io/en/content?hsLang=en#language-management)
- [Media Library](https://support.sitemanager.io/en/content?hsLang=en#media-library)
- [Collaborating on a project](https://support.sitemanager.io/en/content?hsLang=en#collaborating-on-a-project)
- [Page Components](https://support.sitemanager.io/en/page-components?hsLang=en#main-content)
- [Getting Started](https://support.sitemanager.io/en/page-components?hsLang=en#getting-started)
- [HTML](https://support.sitemanager.io/en/page-components?hsLang=en#html)
- [CSS](https://support.sitemanager.io/en/page-components?hsLang=en#css)
- [JavaScript (JS)](https://support.sitemanager.io/en/page-components?hsLang=en#javascript-js)
- [How To](https://support.sitemanager.io/en/page-components?hsLang=en#how-to)
- [Layout Components](https://support.sitemanager.io/en/layout-components?hsLang=en)
- [No-Code Editor](https://support.sitemanager.io/en/no-code-editor?hsLang=en#main-content)
- [Getting Started](https://support.sitemanager.io/en/no-code-editor?hsLang=en#getting-started)
- [Properties](https://support.sitemanager.io/en/no-code-editor?hsLang=en#properties)
- [Advanced](https://support.sitemanager.io/en/no-code-editor?hsLang=en#advanced)
- [Design](https://support.sitemanager.io/en/design?hsLang=en#main-content)
- [Overview](https://support.sitemanager.io/en/design?hsLang=en#overview)
- [Design editor](https://support.sitemanager.io/en/design?hsLang=en#design-editor)
- [Design Panels](https://support.sitemanager.io/en/design?hsLang=en#design-panels)
- [Responsive](https://support.sitemanager.io/en/design?hsLang=en#responsive)
- [Fonts](https://support.sitemanager.io/en/design?hsLang=en#fonts)
- [Layouts](https://support.sitemanager.io/en/design?hsLang=en#layouts)
- [Code](https://support.sitemanager.io/en/code?hsLang=en#main-content)
- [Introduction](https://support.sitemanager.io/en/code?hsLang=en#introduction)
- [Token Management](https://support.sitemanager.io/en/code?hsLang=en#token-management)
- [Project Setup](https://support.sitemanager.io/en/code?hsLang=en#project-setup)
- [ToolStack](https://support.sitemanager.io/en/code?hsLang=en#toolstack)
- [Private Library](https://support.sitemanager.io/en/code?hsLang=en#private-library)
- [Dynamic Content](https://support.sitemanager.io/en/dynamic-content?hsLang=en#main-content)
- [Getting started](https://support.sitemanager.io/en/dynamic-content?hsLang=en#getting-started)
- [Basics](https://support.sitemanager.io/en/dynamic-content?hsLang=en#basics)
- [Advanced](https://support.sitemanager.io/en/dynamic-content?hsLang=en#advanced)
- [External Content](https://support.sitemanager.io/en/external-content?hsLang=en#main-content)
- [Getting started](https://support.sitemanager.io/en/external-content?hsLang=en#getting-started)
- [Configuration & implementation](https://support.sitemanager.io/en/external-content?hsLang=en#configuration-implementation)
- [Logic (Smart Content)](https://support.sitemanager.io/en/logic-smart-content?hsLang=en#main-content)
- [Getting Started](https://support.sitemanager.io/en/logic-smart-content?hsLang=en#getting-started)
- [Configuration & Implementation](https://support.sitemanager.io/en/logic-smart-content?hsLang=en#configuration-implementation)
- [Logic](https://support.sitemanager.io/en/logic-smart-content?hsLang=en#logic)
- [AB testing](https://support.sitemanager.io/en/logic-smart-content?hsLang=en#ab-testing)
- [Timed Content](https://support.sitemanager.io/en/logic-smart-content?hsLang=en#timed-content)
- [Password Protected Content](https://support.sitemanager.io/en/logic-smart-content?hsLang=en#password-protected-content)
- [Smart API](https://support.sitemanager.io/en/logic-smart-content?hsLang=en#smart-api)
- [Integrations](https://support.sitemanager.io/en/integrations?hsLang=en#main-content)
- [Getting Started](https://support.sitemanager.io/en/integrations?hsLang=en#getting-started)
- [Integrations](https://support.sitemanager.io/en/integrations?hsLang=en#integrations)
- [Advanced](https://support.sitemanager.io/en/integrations?hsLang=en#advanced)
- [Modules](https://support.sitemanager.io/en/modules?hsLang=en#main-content)
- [Getting Started](https://support.sitemanager.io/en/modules?hsLang=en#getting-started)
- [Modules](https://support.sitemanager.io/en/modules?hsLang=en#modules)
- [Upgrade Center](https://support.sitemanager.io/en/upgrade-center?hsLang=en#main-content)
- [Components](https://support.sitemanager.io/en/upgrade-center?hsLang=en#components)
- [Forms](https://support.sitemanager.io/en/forms?hsLang=en#main-content)
- [General](https://support.sitemanager.io/en/forms?hsLang=en#general)
- [Captcha](https://support.sitemanager.io/en/forms?hsLang=en#captcha)
- [Form Actions](https://support.sitemanager.io/en/forms?hsLang=en#form-actions)
- [Extending Forms](https://support.sitemanager.io/en/forms?hsLang=en#extending-forms)
- [Email Templates](https://support.sitemanager.io/en/forms?hsLang=en#email-templates)
- [Advanced](https://support.sitemanager.io/en/forms?hsLang=en#advanced)
- [Cookie Settings](https://support.sitemanager.io/en/cookie-settings?hsLang=en#main-content)
- [Getting Started](https://support.sitemanager.io/en/cookie-settings?hsLang=en#getting-started)
- [Configuration](https://support.sitemanager.io/en/cookie-settings?hsLang=en#configuration)
- [API Call](https://support.sitemanager.io/en/api-call?hsLang=en#main-content)
- [Configuration](https://support.sitemanager.io/en/api-call?hsLang=en#configuration)
[](https://support.sitemanager.io/en?hsLang=en)
Copyright © 2026, SiteManager Group