With email templates, it becomes possible to structure and style your emails however you want. If you just want to include your logo for a personal touch, then you can do so. If you want to send a fully customized email with loads of images and a wall of text, then you can do this as well. It is even possible to just send some cat GIFs, if you're into that (we know we are!).
We will explore the following topics:
- Where to edit and create email templates.
- Basic templating info, to get you going.
- Special variables you can use inside your templates.
- How to add images.
- How to connect a template to a form.
Where to edit and create email templates
You can find the module under the mail templates section of the developer tab in the top navigation of your project. By default, our own default template will be available to view and edit. For your own good, it's not possible to remove the default template. It would be a shame if all templates were to be deleted and no mails are being sent.
Editing and creating templates is a code feature, and thus won't support our no-code builder. There are, however, loads of external online tools available where you can create a unique template by dragging and dropping. You can then export the template as an HTML-file, and upload the template in the module. Feel free to contact support if you have any questions or if you'd like some help with this!
If you just want to add a logo to the default template, then you can do so by editing the template. You can also copy the template and start from there.
If you want to start from scratch, new templates can be added through + button in the top right of the table. You can also upload existing HTML-templates, if you have already built the template.
If you were ever to make a crucial mistake in your template, which would deem the template invalid, a backup default template will be used. Go check your template if you're suddenly not receiving your customized emails anymore. There's probably a mistake somewhere!
Basic templating info
Under the hood, we use Twig as our templating engine. If you're just using static templates or if you only need to display some variables, then you don't need to know the specifics of Twig. For more advanced templating, however, a basic understanding of Twig will be necessary.
We are not going to explain Twig ourselves, since this is quite an in-depth language. Check out their docs if you need more information. You can always reach out to support if you need some more assistance!
Special variables you can use inside your templates
The following variables are available for you to use inside the template:
| Variable | Function |
| subject | The subject of the email, as set in the CMS. |
| title | The title of the email, as set in the CMS. |
| name | The name of the sender, as set in the CMS. |
| nameRecipient | The name of the recipient, as set in the CMS. |
| copy | A boolean to indicate whether the mail is a copy to the visitor, or not. You can use this to create one template for both emails, and still be able to have different content. |
| copySubject | The subject of the copy mail, as set in the CMS. |
| copyTitle | The title of the copy mail, as set in the CMS. |
| emailClient | The email-address of the visitor. |
| colorBackground | The HEX code for the background, as set in the functionality panel. |
| colorFont | The HEX code for the font, as set in the functionality panel. |
| website | The location of where the form was sent from. |
| fields | An array of the fields that have been filled in. See below for more info. |
Be aware that, according to the Twig syntax, you'll need to wrap the variables with double curly brackets to print them.
The fields variable is a little special, and you'll need a basic understanding of the templating language that is being used. It contains all added fields of your form, structured as a key-value pair, where the key is the label and the value is the supplied value.
For example, if you have a form with a field that has name as a label, you could access the supplied value through fields['name'] (don't forget to add the double brackets).
The suffix |i (where i is the index of the duplicated label) will be added to your label, should you have duplicate labels in your form. For example, when you have added a field with label street twice, you can access the second street input by using fields['street|1]'].
Many times you might want to display a list of the supplied values. You can do so by looping over the fields and printing each iteration, or you can target each field directly.
In the code snippet below, you can see a simplified version of how we display all the fields in the default template. You can check out the full version when you edit the template yourself.
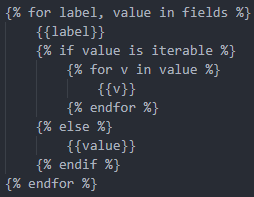
In the code snippet above, we loop through all the fields and print the label. If a value is iterable, for example when you're using checkboxes or a multi-select, we loop over the value and display the individual values. If not, we're just displaying the value as a whole.
How to add images
Most email templates won't be complete without a few images. How else are you going to show your favorite cat GIFs?
You can upload all your images in the module, by navigating to the image files section. All uploaded images will show the image path that you can use in your template. Be aware that this needs to be the fully qualified domain name, and thus should include your own domain. For example, when the image path is being shown as swfiles/mail/images/mycats.gif, the source of your image should be https://mywebsite.com/swfiles/mail/images/mycats.gif.
How to connect a template to a form.
Right, you have created the email template of your dreams. Now the only thing that's left, is connecting the template to a form on your website. Each form can have their own template associated with it, or you can just use the same template for each form.
When you edit the form in the CMS, navigate to your form actions and add the default mail action, if not already added. Here you will have the possibility to select a template for your main email, as well as for your copy email. These dropdowns are language independent, so your templates can be language specific as well!
If you're not able to select a template, upgrade your form to the newest version. You can do so by re-adding the form snippet, or by re-adding one of the form components from the public library.
Feel free to contact support if you don't want to change your existing form, but be aware that we might charge an additional cost to update the form manually.
If you want even more control over your emails, be sure to check out our SMTP-module!