Connecting to Mailchimp
To use the Mailchimp action, it is necessary to authenticate with Mailchimp first. We need to know in which account the subscriber needs to be added. Luckily, this is a very straightforward setup, so you'll be up and running in no time!
To learn more about Integrations, you can read our article here.
Form action
When editing your form component, you can add the Mailchimp action by clicking the 'Edit Form Actions' button. Here you can add all the actions, including the Mailchimp action.
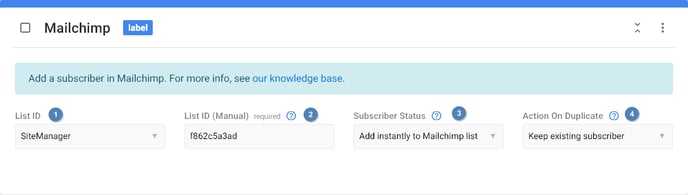
- List ID: Select a list from this dropdown. Your list ID will be automatically filled in when you do select a list. If you don't have yet authenticated with the Mailchimp app, you won't see this dropdown.
- List ID (manual): The list ID of the audience to which the subscriber needs to be added. This value will be automatically filled in when selecting an audience from the dropdown. You can also manually insert the list ID here. See this article for more info about finding your list ID manually.
- Subscriber status: Choose whether the subscriber needs to be added directly to your audience, or that a confirmation mail needs to be sent first. We strongly advise to always send a confirmation mail, as per the GDPR guidelines.
- Action on duplicate: Choose what should happen when a duplicate subscriber exists.
Possible options are:- Keep existing subscriber: The data of the contact that is currently subscribed will be kept. The new data will be discarded, but the form won't throw an error.
- Replace non-empty form values: All non-empty values will be added to the currently subscribed contact. Other values that are empty, or aren't part of the form, will be left untouched.
- Replace all form values: All values will be added to the currently subscribed contact. Other values that aren't part of the form will be left untouched.
- Replace all possible values: All values will be added to the currently subscribed contact. Other values that aren't part of the form will be reset to an empty value.
If you don't see the on duplicate setting, the second option (replace non-empty values) will be used. Update to the latest form if you want to select a different option.
Build form
You can insert multiple form inputs to collect different kinds of data. Be sure to include a submit button (as that is required for every form), and an email field. The email field is required to create a subscriber in Mailchimp and needs to have the EMAIL tag added to it.
Input data
Each field that you want to send to Mailchimp, needs to have a tag. You can do so by editing the input data on a field and by adding the Mailchimp data. Each tag needs to be identical to the tag set in your Mailchimp form. That's right, you also need to build a form in Mailchimp. You only need to include the fields that you want to push to Mailchimp, however, and you don't need to style the form in Mailchimp. Only the input fields will be used to connect the form to the form on the website. See this article for more info.