IMPORTANT: This Teamleader module is no longer available in our platform, to integrate Teamleader check out how to connect your SiteManager Form to external platforms
Connecting to Teamleader
To use the Teamleader action, it is necessary to authenticate with Teamleader first. We need to know in which account the contact or deal needs to be created. Luckily, this is a very straightforward setup, so you'll be up and running in no time!
Teamleader app
When you install a form, the Teamleader app (and all other relevant apps) will be automatically installed in your project. You can find the app in the toolstack section of the project.
If it's the first time authenticating with Teamleader, you will find only a single button inside the app. By clicking on this button, a new window will be opened where you can log in to Teamleader. When you have been successfully authenticated, you will see some details of your Teamleader account. It is also possible to select a department and a representative to which the contact and/or deal will be linked.
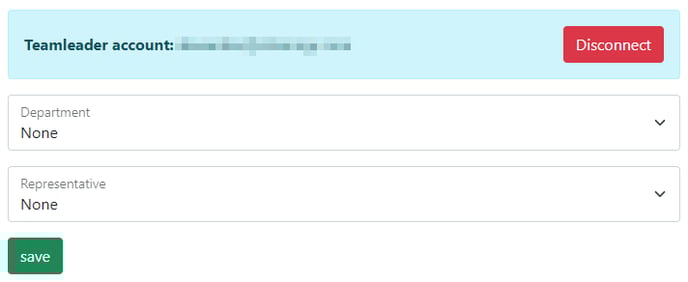
Be sure to save your changes by clicking the save button at the bottom of the page.
Form action
When editing your form component, you can add the Teamleader action by clicking the 'Edit Form Actions' button. Here you can add all the actions, including the Teamleader action.
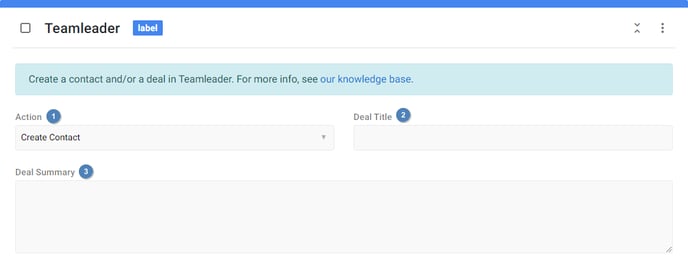
- Action: The action that will be executed when submitting the form. Possible actions are creating a contact and creating a contact with a deal.
- Deal title: The title of the deal that will be created. Only applicable when the action is set to create a contact with a deal. This field is also required when this is the case.
- Deal summary: A short summary of the deal that will be created. Only applicable when the action is set to create a contact with a deal.
Build form
You can insert multiple form inputs to collect different kinds of data. Be sure to include a submit button (as that is required for every form), an email field and a text field with the attribute 'last name'. The email and last name field are required to create a contact in Teamleader.
Input data
Each field that you want to send to Teamleader, needs to be marked with an attribute. You can do so by editing the input data on a field and by adding the Teamleader data. Next you can select an attribute from the list. If for example you select 'First Name', the value that the visitor fills in will be used as the first name in Teamleader.
Special cases
We won't go over each attribute individually, as most of these are pretty self-explanatory. Some attributes are a bit special however and require a little more information.
- Last Name: As stated above, you always need to have a last name somewhere in your form.
- Email: As stated above, you always need to have an email somewhere in your form.
- Gender: According to Teamleader, there are only 2 possible genders. Please make sure that these genders are always forced and can never be freely filled in. For example, you can use this attribute on a dropdown which has prefilled values. You can't use it on a normal text field, as the value can differ from what Teamleader expects. The two existing genders are male and female.
- Birthdate: Teamleader expects a date in the following format: 1970-12-31. Be sure to set up your date field to parse the date in this format. See our datepicker article for more info.
- Marketing Mails Consent: This attribute can be used to enable the visitor to opt-in to marketing mails. For this reason, this attribute can only be used with the opt-in or checkbox field. Don't use this attribute on a normal text field for example!