How to connect the SiteManager Form to Flexmail
This article will explain how to connect the SiteManager form to Flexmail. Every time the form will be submitted, a new subscriber will be added to (or updated from) your contacts.
Connecting to Flexmail
To use the Flexmail action, it is necessary to authenticate with Flexmail first. We need to know in which account the subscriber needs to be added. You can add Flexmail in the integrations section of the project dashboard.
To learn more about Integrations, you can read our article here.
Obtaining credentials
To connect to Flexmail, we need your account ID and your Personal Access Token. The account ID can be accessed from the profile page, but this is also visible when you activate the dropdown in the top right of your Flexmail account.
Be sure to only use the part after the dash (-). For example, when your total account ID is D-123456, only use 123456.
You can create the Personal Access Token from the API section in the settings page of your Flexmail account. Create your token, give it a recognizable label, and copy the generated value.
You can only view your Personal Access Token once. Be sure to store the token somewhere safe, if you want to use the same token again in the future.
Both values can now be used to connect the Flexmail integration in your project dashboard.
Form action
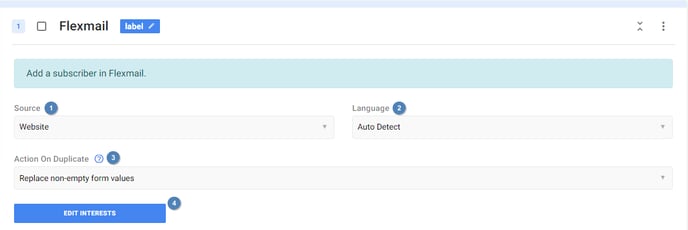
When editing your form component, you can add the Flexmail action by clicking the 'Edit Form Actions' button. Here you can add all the actions, including the Flexmail action. You can find this action in the Leads & CRM Folder.

- Source: Select the source that needs to be associated with the contact. This dropdown will show a list of all your available sources.
- Language: Select the language of the contact. This dropdown will show a list of all your available languages. You can also choose to use the currently active language, but make sure that all your website languages are also enabled in Flexmail, and that the language configuration in your project is set up correctly.
- Action On Duplicate: Choose what should happen when a duplicate subscriber exists.
Possible options are:- Keep existing subscriber: The data of the contact that is currently subscribed will be kept. The new data will be discarded, but the form won't throw an error.
- Replace non-empty form values: All non-empty values will be added to the currently subscribed contact. Other values that are empty, or aren't part of the form, will be left untouched.
- Replace all form values: All values will be added to the currently subscribed contact. Other values that aren't part of the form will be left untouched.
- Replace all possible values: All values will be added to the currently subscribed contact. Other values that aren't part of the form will be reset to an empty value.
- Interests: You can add one or more interests to the contact. These interests will be added by default for every created contract. See the input data section if you want to dynamically add an interest.
Build form
You can insert multiple form inputs to collect different kinds of data. Be sure to include a submit button (as that is required for every form), and an email field. The email field is required to create a contact in Flexmail and needs to have the EMAIL tag added to it.
Input data
You can connect your inputs to your Flexmail fields, by adding the Flexmail input data to the input. Be sure to connect all your required fields, since no data will be sent otherwise. A list of all available fields will be shown in the dropdown.

For supported inputs, like checkboxes, it is also possible to associate the input with an interest instead. In this case, the Flexmail input data will contain both the available fields, and the available interests.