Add smart variables inside the code editor or enable smart rules for the sitemanager CMS
Note:
Before you can implement Smart Content on your website, you or your project owner need to activate the Smart Content module in your General Project Settings.
Our Smart Content module has recently been renamed to Logic. All documentation will be updated with the new name in the future.
When implementing Logic you can do it either by configuring Smart Rules for the CMS or by adding the Smart Variables inside the code editor.
1. Implementing Smart Rules for the CMS
Smart Rules are a way for content editors to add logic to pieces of content, pages or databases.
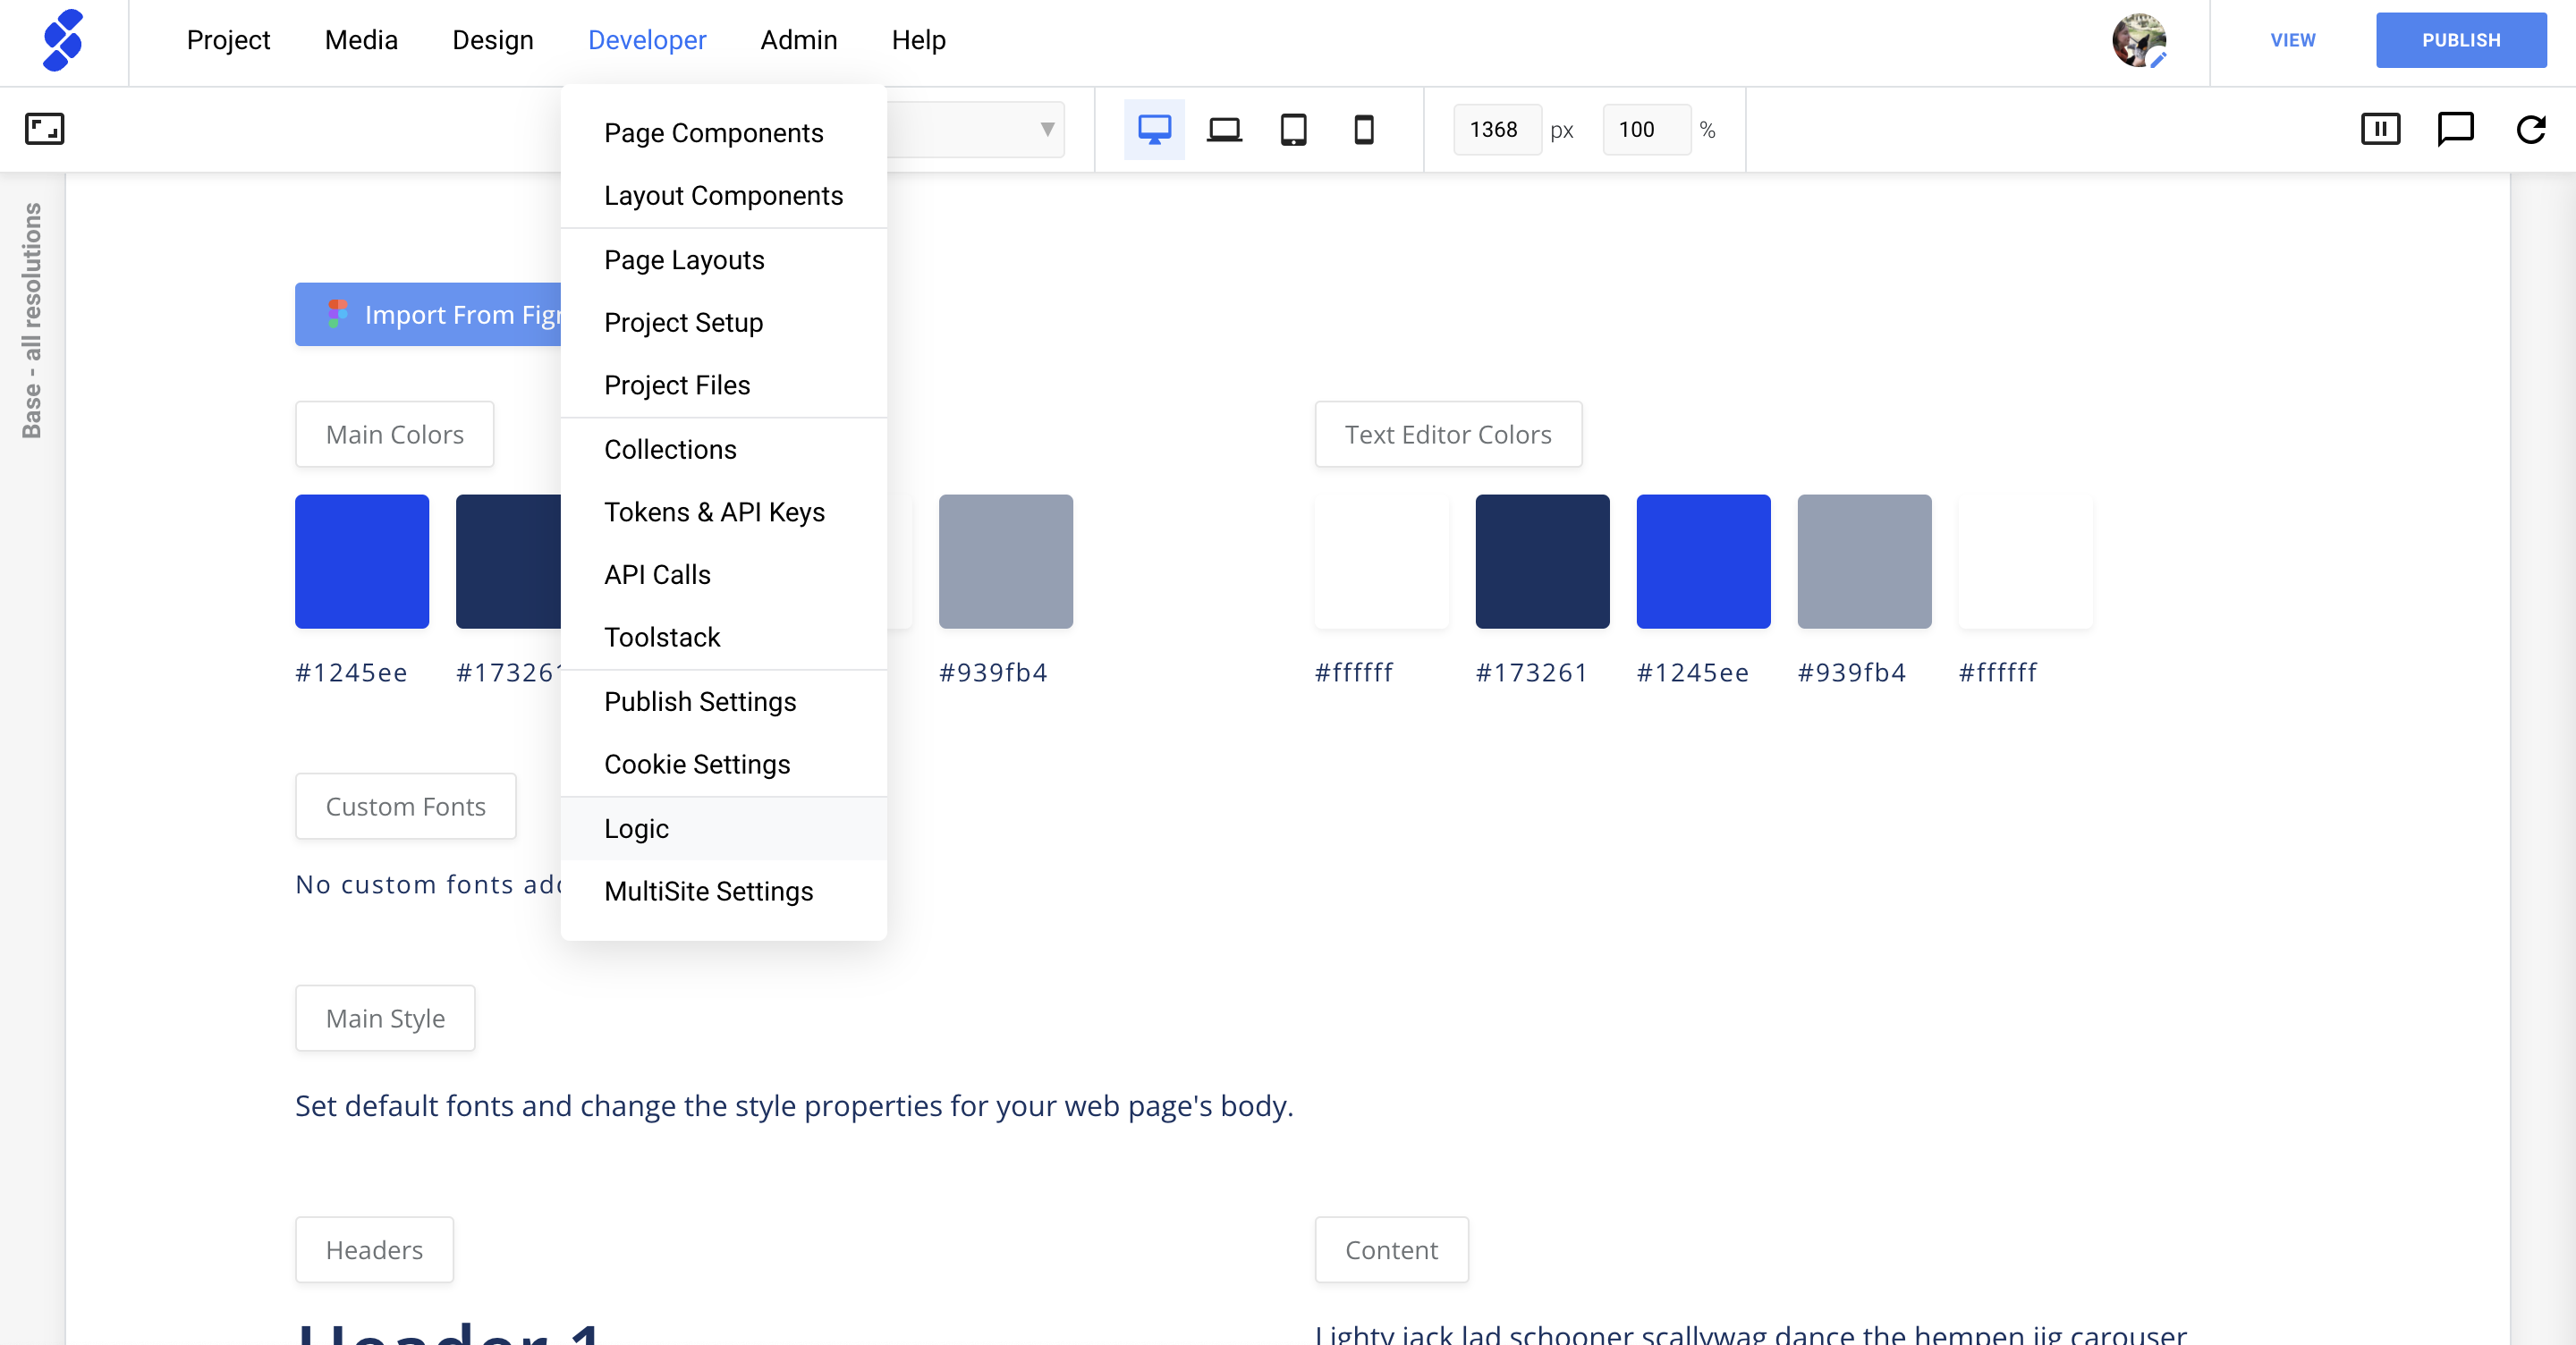
Find the logic-module under Developer in your project.
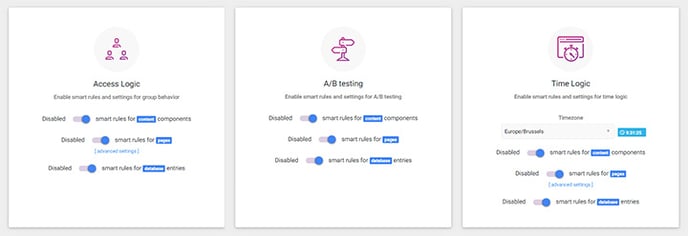
1.1. General Configuration
During the general configuration of Smart Content, you can set smart rules for pages, content and databases. There are 3 types of smart content rulesets:
- Access (or behavior) Rules
- AB testing
- Time Rules
1.2. Form input
When Logic has been installed to your project you will be able to add smart rules as an input field when building CMS forms for page components, layout components or database content. If you are new to SiteManager it is important that you learn these fundamentals by taking the Code (Developer) course in the learn section of the platform or check out this documentation: https://support.sitemanager.io/getting-started-workflow-guideline/10-custom-development/back-end-builder
You decide where and which type of smart rules are applied to any piece of content.
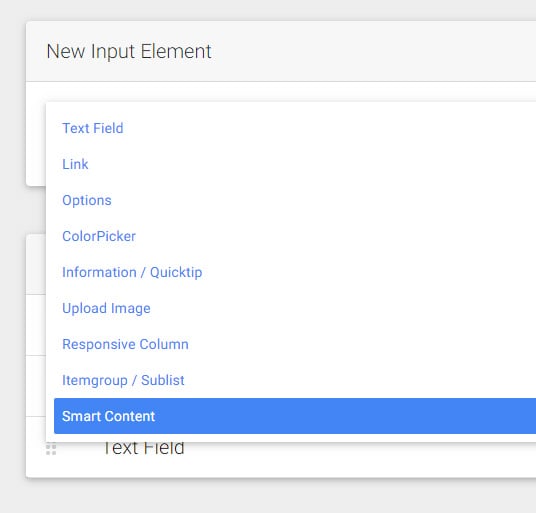
Step 1: Add smart rules as input field for a CMS form
Select the Smart Content option when adding a new input element to your page, layout or database component.
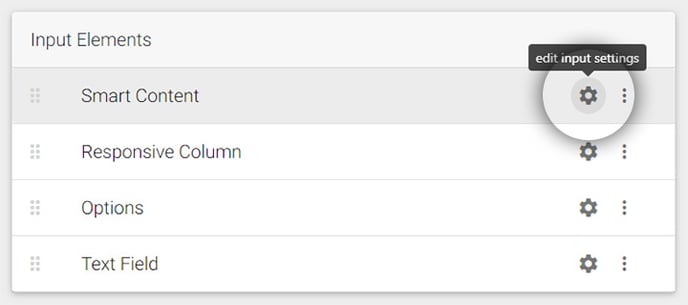
Step 2: Configure the Smart Rules input
Click the edit input settings to configure what smart rules are available for this CMS input
There are 4 settings to configure:
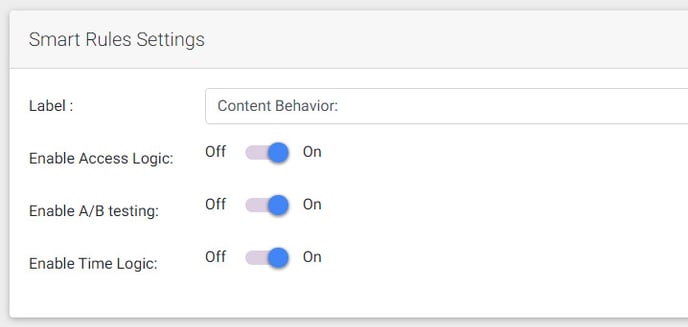
- Label: the name the CMS user will see when adding smart rules to a piece of content
- Enable Access Logic: for behavior or protected content: add the logic is visitor IN or NOT IN a specific group.
- Enable A/B testing: automatically put visitor in certain groups depending on view percentages
- Enable Time Logic: add logic to show content before or after certain time or date requirement
Step 3: Add Smart Rules input to the code
Now that you have set-up the smart rules CMS input you need to add it to the code group where it belongs.

Like all input fields you will be able to see the newly created variables by clicking the ⋯ next to the corresponding input group.
Add the smart rules set [:swvar:smartstart:id:] at the start of the smart content and end it with [:swvar:smartend:id:]
2. Add Smart Variables in the Code Editor
Smart Variables can be used if you want to insert some smart logic directly into the code of a page, layout or database component.
There are Smart Variables available for access (behavior) logic and time logic. AB testing can only be implemented with the Smart Rules for the CMS.
2.1. Smart Access Variables
There are 2 types of smart access variables:
Make content visible when visitor is logged in a specific group:
[:showcontent:id1:(here_comes_code):/endcontent:]
Make content visible when visitor is logged in one of these specific groups:
[:showcontent:id1:id2:id3:(here_comes_code):/endcontent:]
Make content visible when visitor is NOT logged in a specific group:
[:nocontent:id1:(here_comes_code):/nocontent:]
Make content visible when visitor is NOT logged in any of these specific groups:
[:nocontent:id1:id2:id3:(here_comes_code):/nocontent:]
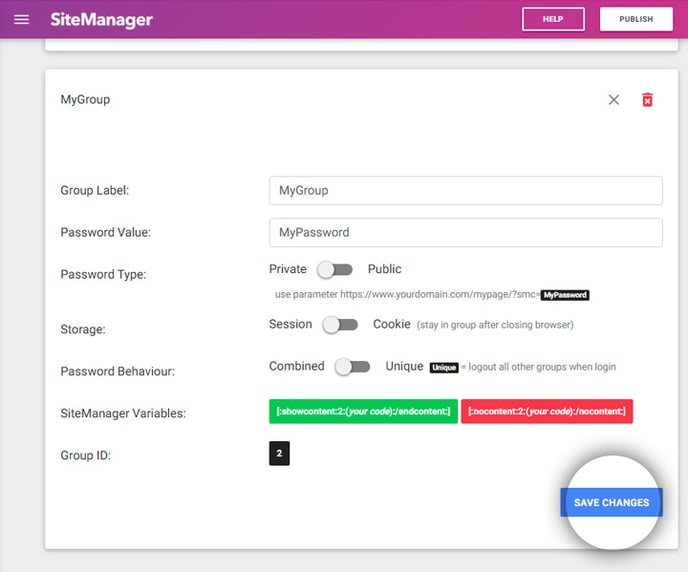
You can find the ID values and examples in the settings of the groups
Example of code that will be rendered on the page when the visitor is inside a group:

2.2. Dynamic Access Variables
When needed, you can get the group id from a collection field. This way you can create very dynamic access variations for each dynamic item.
Make content visible when visitor is logged in a dynamic group:
[:showcontent:dynid_collfield_fieldid:(here_comes_code):/endcontent:]
Make content visible when visitor is NOT logged in a dynamic group:
[:nocontent:id1:(dynid_collfield_fieldid):/nocontent:]
You can find the fieldid when you open the configuration in the field settings of
the collection.
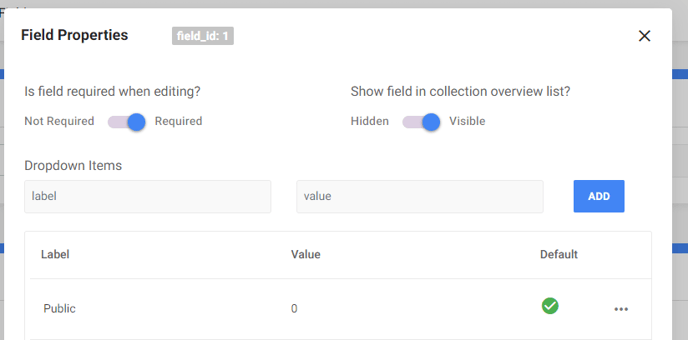
in this example you would use dynid_collfield_1 as the dynamic group variable.
It is important that the value of the dynamic variable corresponds with an existing group id. We have also created the special value 0 that will always be shown with the [:showcontent function and always hidden with the [:nocontent function.
2.3. Smart Time Variables
There are different variations of smart time variables:
From date to date:
[:timecontent:[yyyy/mm/dd-h:m:s]:[yyyy/mm/dd-h:m:s]:( here_comes_code ):/timecontent:]
Starting from date:
[:timecontent:[yyyy/mm/dd-h:m:s]:[null]:( here_comes_code ):/timecontent:]
Until date:
[:timecontent:[null]:[yyyy/mm/dd-h:m:s]:( here_comes_code ):/timecontent:]
From time to time:
[:timecontent:[h:m:s]:[h:m:s]:( here_comes_code ):/timecontent:]
Starting from time:
[:timecontent:[h:m:s]:[null]:( here_comes_code ):/timecontent:]
Until time:
[:timecontent:[null]:[h:m:s]:( here_comes_code ):/timecontent:]
3. Tips when using a lot of groups for your project
When you implement a lot of smart content groups for your project it can become a convoluted experience as all grouped content will be shown inside the visual CMS. The smart rules and variables only work on the published website.
If this is the case for your project it is recommended to use the input smart content option as much as possible (1.2.). You can combine this with the [:swedit( )/swedit:] functionality (is only executed inside the cms and removed when published) to make content invisible inside the visual CMS.
You can use it to add extra CSS where only the first appearence of a class is visible and hiding all the others.
Example:
[:swedit(
<style>
.contentClass {
   display:none;
}

.contentClass:first-child {
    display:block !important;
}
</style>
)/swedit:]
You can also add an extra input option to the element allowing the CMS user to hide the content in the CMS
Example:
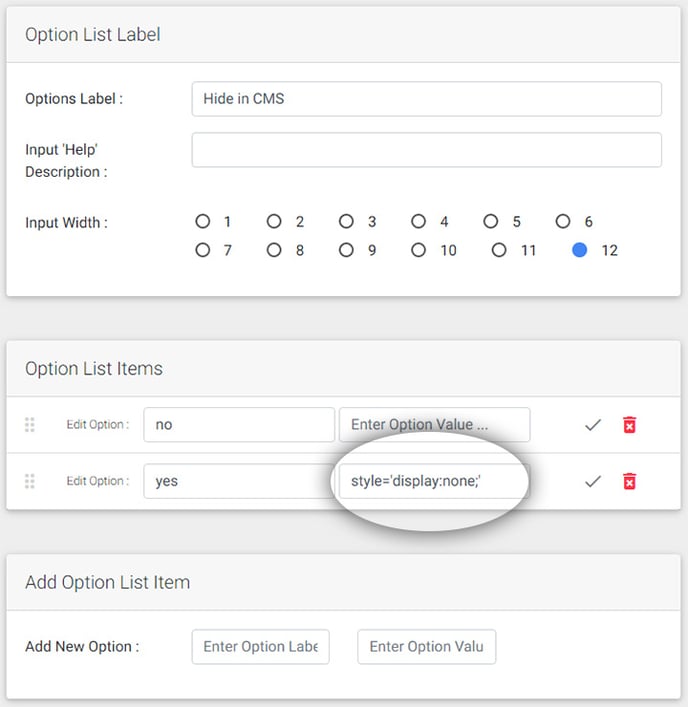
We add an option for the CMS input. When the CMS users selects "yes" the code style='display:none;' will be added to the code.

Using the swedit function the display:none value will only be used when the page is rendered in the CMS. In the published website this will not be the case.
4. Project Files
You can also post or link to project files to put a visitor in a group or out of a group.
However this effect will only be visible when the page is reloaded or the visitor navigates to another page.
These files are mostly used for password protected pages.
4.1. Access Group
post the input variable sPass to the url: (recommended for private passwords)
swfiles/lib/protected.php
or access directly (recommended for public passwords)
swfiles/lib/protected.php?sPass=public_password
you can also use this file with a redirect (when you want to create a link putting the visitor in a certain group)
https://yoursite.com/swfiles/lib/protected.php?sPass=password&redirect=https://yoursite.com
4.2. Leave Group
remove the visitor from all groups
swfiles/lib/logout.php
post the input variable sPass to swfiles/lib/logout.php to logout from a specific group (private groups)
or logout directly (public groups)
swfiles/lib/logout.php?sPass=public_password
you can also add a redirect when linking directly to the file
https://yoursite.com/swfiles/lib/logout.php?sPass=password&redirect=https://yoursite.com