The HTML editor integrates mostly with the CMS while CSS and JavaScript integrate with the Design editor.
Create a new page component: https://support.sitemanager.io/en/create-a-new-page-component
Edit an existing page component: https://support.sitemanager.io/en/edit-a-page-component
code editor:
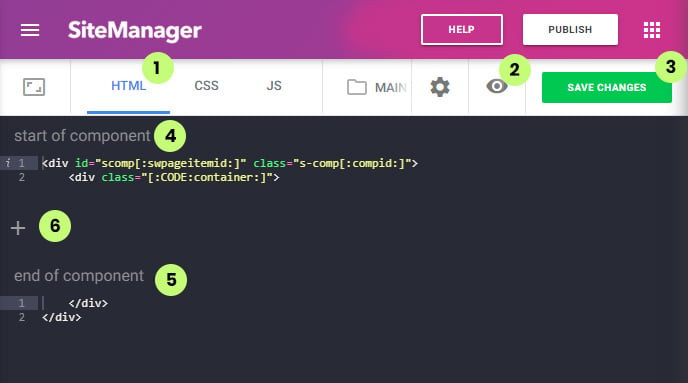
(1) Select the HTML editor
(2) Preview Mode
https://support.sitemanager.io/en/preview-mode-page-components
(3) Save Changes
(4) Start of component
(5) End of Component
(6) Add Code Block
https://support.sitemanager.io/en/add-a-code-block-to-your-page-component
Start of component (4)
The start of the component already has some starting HTML code inside it. This code is needed to integrate with code snippets and the design editor.
Let's analyze it:
class="s-comp[:compid:]"
This class s-comp[:compid:] is used as the default constructor for this component's design panels. Design panels are used inside the design editor so graphic designers without coding skills can easily change the style of this component.
id="scomp[:swpageitemid:]"
One of the features of the design editor for page components is creating instances. An instance makes it possible to have different styling for the component.
Ex: You have a text page component with a white background and black text color.
On the contact page, you want to have a black background with white text color. In the design editor you can create an instance to do this. The styling will not be applied to the component in general but only on the one used on the contact page.
class="[:CODE:container:]"
Remember when we said the HTML editor mostly integrates with the CMS and not with the design editor? [:CODE:uniquename:] variables are the exception. These are added to the HTML and the values are set with the design panels inside the design editor.
The class with [:CODE:container:] is used to set the container behavior with the design application. Default this value will add a container setting the container to the middle.
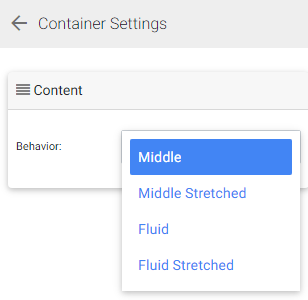
Middle: shows a container with gutter
Middle Stretched: shows a container without gutter
Fluid: show a full-bleed container with gutter
Fluid Stretched: show a full-bleed container without gutter
End of component (5)
Here you see the closing div tags of the main class constructor and container explained in (4).
You can add all static HTML to the start and end of the component click save (3). This HTML will be shown inside the CMS where the page component is used and shown on the website when published.
Of course, we want to create HTML with properties that can be edited inside the visual CMS. To do this we are going to add Content Blocks (6).
Save Changes (2)
If you are done editing the HTML code do not forget to click Save Changes. You can also type CTRL+S to activate the saving function.
If your page component is used in the CMS you will see an eye icon (2) that opens a preview panel to the right.