Starting out
If you don't yet know how to install a component, head over to this article to find out. Install the form component and add it to your page.
Setup
The setup screen of the component is very basic. Only the most common settings can be configured here.
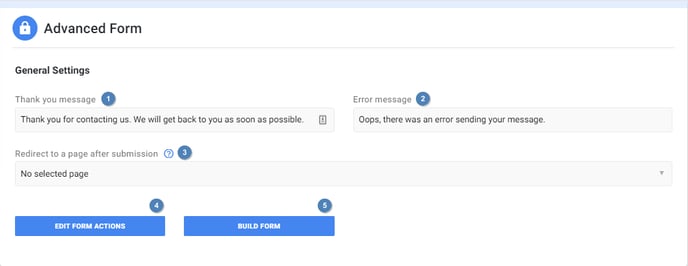
- Thank you message: Change the message that will be shown after a user submits the form. This message will not be shown when a redirect page has been set.
- Error message: Change the error message that will be shown when an error occurs.
- Redirect page: Change the page that the user will be redirected to after submitting the form. Leave this empty to show the thank you message instead.
- Form actions: A list of all actions that are (and can be) added to the form. By default, there are no actions. Make sure to at least add 1 action, otherwise the form won't be doing anything.
- Build form: A list of all the fields that are (and can be) added in the form.
Form actions
Actions are ways to handle the data that the user fills in. For example, it is pretty basic to collect this data and to send the data to your email. It is possible to use only one action, or it is possible to use multiple in conjunction.
The following actions are available to use in your form:
- Teamleader (deprecated)
- Mailchimp
- Google Sheets
- Zapier
- Create a Lead
- Create an Opportunity
- Create a Company
By default, all form actions are asynchronous and all actions will thus be executed simultaneously. This is not always the desired behavior. Sometimes actions should be dependent on each other; if one action fails, another action shouldn't be executed.
You can change this behavior by adding a synchronous action group. Inside this group you can add actions as normal. The only difference is that all actions inside will be executed in the added order. If the first action fails, no other actions inside this group will be executed.
Update to the latest version of the form if you are not able to add a synchronous action group.
Build form
No form is complete without actual inputs. All forms will at least need a submit button (so the user is able to submit the form) and most will also need an email input. You are free however to insert and position these fields as you wish. Some fields are mandatory for certain actions, so make sure to include the right field for the right action. Refer to the action pages above for more information regarding the required fields.
Input data
It is possible to add extra data to an input field. For most actions this will even be required. Adding extra data enables the corresponding action to know which field the data belongs to. For example, Mailchimp needs to know which field is the email field and which field is the name field. This way, the data will always be inserted at the right place, which prevents errors from happening.
The following data attributes can be added to an input:
- Teamleader (deprecated)
- Mailchimp
- Google Sheets (not required)
- Zapier
- Flexmail
- Lead (deprecated)
- Company (deprecated)
- Contact (deprecated)
As you can see, the email action is missing from this list. This is because with this action all of your fields will be automatically sent to your email.
Connected actions
It is also possible to connect certain action to an opt-in field. These connected actions will only be executed when the opt-in field is checked by the user. This could be useful in certain cases, for example when wanting an opt-in, where the user can decide if he wants to be added to the mailing list.
To connect an action to an opt-in, simply add the action to the field, by editing the connected actions. From now on, the opt-in needs to be checked for this action to be executed.
If you don't see the option to add connected actions in your opt-in field, you might need to update the field. Simply add a new opt-in snippet to the form to get the latest version.